Side Dishes
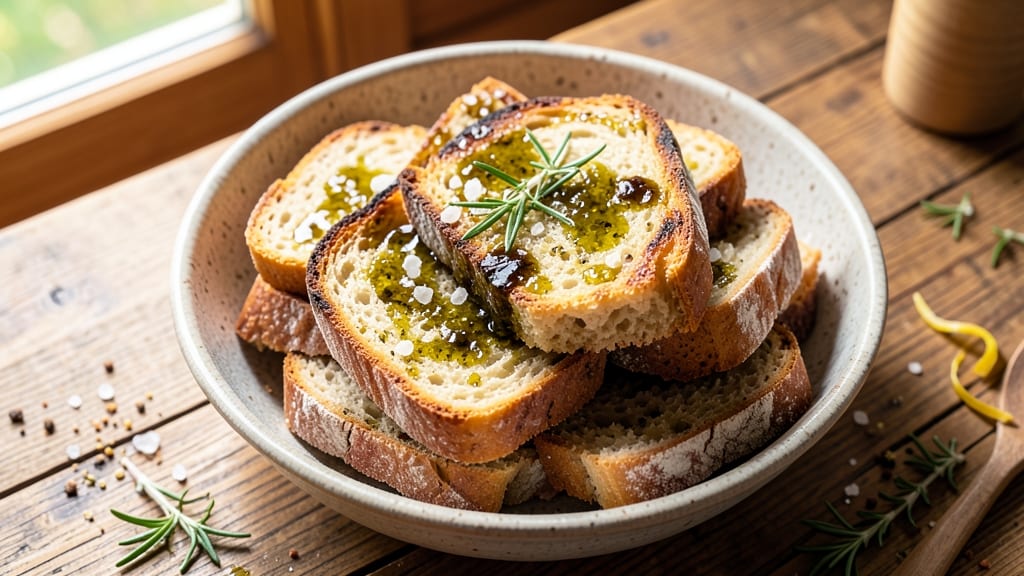
This artisan olive oil bread recipe transforms simple ingredients into a loaf with a golden crust and rich, fragrant aroma that lingers in every bite. The secret lies in the high-quality olive oil, which infuses the dough with Mediterranean brightness while creating a tender crumb and crisp exterior.
I've perfected this technique over years of baking, ensuring each slice delivers that perfect balance of texture and flavor.
What sets this bread apart is the methodical approach to dough development—proper kneading, precise proofing times, and high-heat baking all contribute to that signature artisan quality. The olive oil doesn't just add flavor; it creates a moist, slightly chewy interior with a crackly crust that's impossible to resist.
This recipe yields a foolproof loaf that's perfect for toast, sandwiches, or simply enjoying with olive oil and fresh herbs.
By the time you pull this loaf from the oven, your kitchen will smell like a Tuscan bakery, and the bread will have that satisfying weight and texture that defines artisan bread. The crust develops beautiful golden flecks while maintaining structural integrity, and the crumb remains open yet tender.
This is bread that elevates any meal—whether served warm with butter or used as the base for your favorite sandwich.
The beauty of this recipe is its versatility. Use it for breakfast toast, dinner rolls, or as a side to soups and salads. The olive oil infusion makes it particularly well-suited for Mediterranean dishes, but its universal appeal means it works anywhere.
Let's get started on creating your perfect artisan loaf.
Ingredients for artisan olive oil bread
Nine simple ingredients for bread that smells like a Tuscan bakery.
| Ingredient | Amount | Notes |
|---|---|---|
| Extra-Virgin Olive Oil 🫒 | ½ cup | High-quality, fruity variety |
| Active Dry Yeast 🍞 | 2 ¼ tsp | Freshly opened package |
| Warm Water 💧 | 1 ¼ cups | 110°F for activating yeast |
| All-Purpose Flour 🌾 | 4 cups | Bread flour preferred |
| Granulated Sugar 🍚 | 1 tbsp | Feeds yeast for activation |
| Salt 🧂 | 1 ½ tsp | Diamond Crystal preferred |
| Cornmeal 🌽 | ¼ cup | For dusting baking sheet |
| Coarse Sea Salt 🧂 | 1 tsp | For sprinkling crust |
| Ice Water ❄️ | ¼ cup | For final dough adjustment |
The olive oil is non-negotiable here—look for extra-virgin with fruity notes like California Early Harvest or Colavita. Whole Foods or Trader Joe's carry great options, but any high-quality bottle will work. The yeast needs to be fresh, so check the expiration date—it should be within 4 months of purchase. For flour, King Arthur Bread Flour gives the best results, but all-purpose works in a pinch. The sugar and salt are simple, but the quality matters too: organic cane sugar and Diamond Crystal kosher salt make a difference in flavor.
No extra-virgin olive oil? Light olive oil works, but the flavor won't be as rich. Running out of bread flour? All-purpose plus 1 tbsp vital wheat gluten mimics the protein structure. The cornmeal is just for dusting—semolina works too. If you're in a rush, instant yeast can replace active dry yeast (just skip the proofing step). For the sea salt, any coarse variety works—Maldon is ideal if you want that signature flaky texture. And if your dough feels too sticky, add ice water 1 tbsp at a time until it comes together.
This dough needs patience—proof it twice for that perfect rise. Store leftovers wrapped in a clean kitchen towel for 3 days at room temperature, or freeze slices for 3 months. For reheating, wrap in foil and warm in a 350°F oven for 5 minutes. The crust stays crisp for 24 hours if kept in an airtight container, but it's best enjoyed fresh. Make a double batch—this bread disappears fast.
Why You'll Love This Recipe
- No-Knead Magic: I swear by this—just mix, wait, and bake. The yeast does all the work while I sip coffee, and that golden crust? Worth the 10-minute hands-off time.
- Rich Olive Oil Love: That first pull-apart bite? Pure flavor payoff. The EVOO infuses into the dough like a hug—no fancy ingredients, just honest, buttery richness from the oil itself.
- Weeknight Hero: Toss a loaf in the freezer on Sunday, and you’ve got breakfast, lunch, or dinner covered. Toast it straight from frozen, or reheat slices in a pan for garlic bread in seconds.
- Budget-Friendly Staple: Flour, yeast, and oil are pantry basics—this loaf costs pennies per serving. Between us, I’ve fed a crowd of six for under $5, and they all asked for seconds.
Step-by-step instructions for artisan olive oil bread
Here's how to craft bread with a golden crust and fragrant olive oil infusion that'll make your kitchen smell like a Tuscan bakery.
Activate the Yeast with Warm Water and Sugar
In a small bowl, combine the 1.25 cups warm water (it should be 110°F—warm to the touch but not hot) with the 1 tbsp granulated sugar. Sprinkle the 2.25 tsp active dry yeast over the top and let it sit for 5-10 minutes until it becomes frothy and bubbly. This tells you the yeast is alive and ready to work its magic.
If the mixture doesn't bubble after 10 minutes, your yeast might be dead—start over with fresh yeast. The sugar feeds the yeast, helping it multiply and create those essential air bubbles for light, fluffy bread. Don't skip this step; it's the foundation of your bread's rise.
Mix the Dough with Olive Oil and Flour
In a large bowl, whisk together the 4 cups all-purpose flour and 1.5 tsp salt. Create a well in the center and pour in the yeast mixture along with the 0.5 cup extra-virgin olive oil. Using a wooden spoon or your hands, mix until a shaggy dough forms—it'll look messy at first, but that's okay.
Knead the dough on a lightly floured surface for 8-10 minutes until it becomes smooth and elastic. You'll know it's ready when it springs back slowly when poked. The olive oil adds richness and helps create that golden crust, but it also makes the dough slightly sticky—don't over-flour it or the texture will suffer.
First Rise for Flavor Development
Place the dough in a lightly oiled bowl, cover it with a damp towel, and let it rise in a warm place for 1-2 hours or until it has doubled in size. The warmth helps the yeast work faster, but don't rush this step—it's where the dough develops its flavor and structure.
I like to place my bowl on top of my oven with the light on (creates gentle warmth) or near a sunny window. Poke the dough gently—if it springs back slowly and leaves a slight indent, it's ready. If it springs back quickly, give it more time. The dough should feel light and airy, not dense.
Shape and Second Rise for Structure
Punch down the dough to release air, then divide it into 4 equal pieces (about 8 ounces each). Roll each piece into a smooth ball and place them in a 9x5-inch loaf pan lined with parchment paper. Brush the tops with a little water and sprinkle with 1 tsp coarse sea salt—this will create that beautiful crust.
Cover the loaf pan with a damp towel and let the dough rise again for 30-45 minutes until it's puffy and just about overflowing the pan. The second rise is shorter but crucial—it gives the bread its final structure before baking. If your kitchen is cold, give it the extra time to rise properly.
Bake to Golden Perfection
Preheat your oven to 375°F and sprinkle 0.25 cup cornmeal evenly over the bottom of a baking sheet. Once the oven is hot, carefully transfer the loaf pan to the prepared baking sheet. Bake for 30-35 minutes until the bread is golden brown and sounds hollow when tapped on the bottom.
Here's the thing—don't open the oven during baking or the bread will collapse. The cornmeal creates steam, which helps develop that crispy crust. When you pull it out, let it cool in the pan for 10 minutes before transferring to a wire rack. The crust will firm up as it cools, but it'll still be warm and fragrant.
Pro Tips For Making Artisan Olive Oil Bread
- Test Yeast First: I learned this the hard way—skip the test, and you might end up with a dense, flavorless brick. Mix 1 teaspoon of yeast with ¼ cup warm water (110°F) and 1 teaspoon sugar. If it bubbles within 5 minutes, your yeast is active. No bubbles? Toss it and start fresh.
- Oil the Bowl: This isn’t just about easy cleanup—it’s about texture. After kneading, coat the bowl with 1 tablespoon of that extra-virgin olive oil before letting the dough rise. The oil creates a slick barrier that keeps the dough from sticking and helps develop a crispier crust later.
- Punch Down Hard: When deflating the dough after the first rise, don’t tap it gently. Slam your fist down twice in the center to break up the gluten fully. This step ensures your bread won’t collapse in the oven and gives you that professional-looking structure.
- Preheat with Steam: Sounds weird, but it works: Place a metal bowl of boiling water in your oven while preheating to 425°F. The steam mimics a professional bakery’s environment, helping the crust rise faster and preventing that sad, flat top. Remove the bowl right before baking.
Common mistakes when making your artisan olive oil bread
Over-Kneading the Dough
The olive oil in this dough makes it naturally sticky, so it's tempting to add extra flour while kneading. But over-kneading—beyond 8-10 minutes—can develop too much gluten, making your bread dense instead of tender. I've seen this happen when people panic about sticky dough.
Instead, wet your hands slightly and use just enough flour to keep it from sticking to the surface. The dough should be smooth but still slightly tacky—like a well-worked piece of Play-Doh. 💫
Skipping Proofing Steps
Rushing the two proofing stages is a common mistake that kills texture. The first rise (1-2 hours) builds flavor, while the second rise (30-45 minutes) creates structure. I once tried cutting the first rise to 30 minutes—my bread turned out flat and gummy.
Use a warm spot (like your oven with the light on) to speed things up safely. A toothpick test works: poke the dough—if it springs back slowly, it's ready.
Using Low-Quality Olive Oil
This isn't just about flavor—using light olive oil instead of extra-virgin changes the bread's texture. The high-quality oil creates that signature crackly crust and moist crumb. I recommend brands like Colavita or California Early Harvest from Whole Foods.
Even a $15 bottle makes a difference compared to store-brand options. The oil should smell fresh and fruity, not stale or bitter.
Opening the Oven Too Soon
Peeking during baking releases steam and causes the bread to collapse. The cornmeal on your baking sheet creates that steam you need for a crisp crust. I've had to restart entire batches because I couldn't resist checking.
Set a timer and trust the process—your bread will be perfect when it's golden brown and sounds hollow when tapped. The 10-minute rest after baking is crucial too; it lets the crust set properly.
Ignoring the Ice Water
If your dough feels too sticky after kneading, adding ice water 1 tablespoon at a time helps tighten the gluten structure. I've had to add up to ¼ cup in stubborn batches. The cold water strengthens the dough without drying it out.
Skip this, and your bread might spread too much in the pan or develop an uneven crust. Keep a small bowl of ice water handy during kneading—it's your secret weapon for perfect texture.
Overcrowding the Pan
Dividing the dough into 4 equal pieces (about 8 ounces each) is key—any larger, and your bread won't rise properly. I once tried baking two full loaves in one pan, and they ended up dense and flat.
Use a kitchen scale for accuracy, or eyeball it by making balls that look like tennis balls. The dough should fill the pan but not overflow before baking. This ensures even baking and that beautiful oven-spring rise. 🔥
Nutrition facts
Frequently asked questions
Can I substitute butter for the olive oil in this recipe?
While you can technically substitute butter, it won't give you the same flavor or texture. Olive oil creates that signature moist crumb and crisp crust that butter can't match. If you're out of olive oil, use light olive oil—it's less flavorful but still better than butter for this recipe. The olive oil is what makes this bread truly artisan.
How long will this bread stay fresh?
This artisan bread stays fresh for 3-4 days when wrapped in a clean kitchen towel at room temperature. For longer storage, slice the bread and freeze the pieces for up to 3 months. To reheat, wrap slices in foil and warm in a 350°F oven for 5 minutes until crispy again. The crust stays perfect for 24 hours if kept in an airtight container.
Why did my bread turn out dense instead of light?
Dense bread usually means over-kneading or under-proofing. The olive oil makes the dough sticky, so it's easy to over-flour it while kneading—this develops too much gluten. Also, make sure you're giving the dough both proofing stages: 1-2 hours for the first rise and 30-45 minutes for the second. Use a warm spot (like your oven with the light on) to help the yeast work properly.
Can I make this bread without a stand mixer?
This dough is perfect for hand-kneading. Wet your hands slightly to prevent sticking, and knead for 8-10 minutes on a lightly floured surface. The dough should be smooth and slightly tacky—like well-worked Play-Doh. The olive oil makes it naturally sticky, so resist the urge to add extra flour. A wooden dough scraper helps if it gets too sticky.
What's the best way to serve this olive oil bread?
This bread is incredibly versatile! Toast it with a drizzle of extra-virgin olive oil and fresh herbs for breakfast. Use it for sandwiches with Mediterranean fillings like hummus, roasted vegetables, and feta. It also pairs beautifully with soups, salads, or simply enjoy it warm with butter. The fragrant olive oil flavor makes it perfect for any meal—especially with olive tapenade or marinated olives.