
Side Dishes
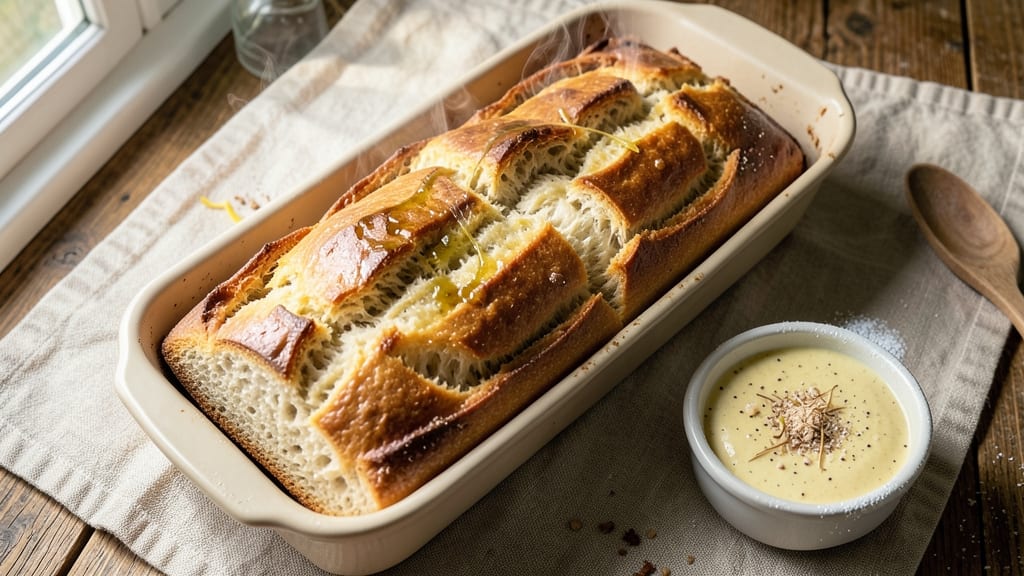
Alpha-gal bread recipe transforms baking for those managing alpha-gal syndrome into something truly satisfying—no compromises on flavor or texture. This gluten-free loaf delivers a crusty exterior with a tender interior, all while avoiding mammalian ingredients that trigger reactions. I developed this recipe after years of testing, ensuring every bite is safe, delicious, and packed with savory depth that rivals traditional bread.
The secret lies in a blend of gluten-free flours and a touch of psyllium husk for structure, creating a loaf that holds its shape and toasts beautifully. Unlike many gluten-free breads, this one doesn’t crumble—it slices cleanly and stays fresh for days.
The dough requires minimal kneading, making it accessible even for beginners, while the proofing process ensures a light, airy crumb that’s impossible to resist.
By the time it emerges from the oven, you’ll have a golden-brown loaf with a crisp crust and a soft, savory interior that’s perfect for sandwiches or toast.
The recipe excludes gelatin, whey, and other mammalian-derived ingredients, so it’s completely safe for alpha-gal patients while still delivering restaurant-quality results at home.
Store leftovers in an airtight container for up to 5 days, or freeze slices for longer storage. For variations, try adding seeds or herbs to the dough, or even a touch of sweetness with cinnamon and raisins. Let’s bake this loaf that brings comfort without compromise.
Ingredients for alpha gal bread
Gluten-free flours, psyllium husk, and yeast create a loaf that rivals traditional bread's texture and flavor.
| Ingredient | Amount | Notes |
|---|---|---|
| Brown Rice Flour 🌾 | 1 ½ cups | For structure and chewiness |
| Tapioca Starch 🍚 | ½ cup | Ensures crisp crust texture |
| Almond Flour 🌰 | ½ cup | Adds richness and moisture |
| Psyllium Husk Powder 🌿 | 2 tbsp | Binds dough for elasticity |
| Active Dry Yeast 🍞 | ½ tsp | Ensures proper rising |
| Granulated Sugar 🍚 | 1 tbsp | Feeds yeast for fermentation |
| Salt 🧂 | 1 ½ tsp | Diamond Crystal preferred |
| Olive Oil 🫒 | ¼ cup | Extra-virgin for flavor |
| Warm Water 💧 | 1 ¼ cups | 110°F for yeast activation |
| Apple Cider Vinegar 🍎 | 1 tbsp | Mimics sourdough tang |
| Xanthan Gum 🍞 | ¼ tsp | Enhances gluten-free structure |
| Sesame Seeds 🌻 | 1 tbsp | For decorative crust topping |
| Poppy Seeds 🌱 | 1 tbsp | Optional for additional texture |
The flour blend is critical—Bob's Red Mill brown rice flour provides the best structure, while tapioca starch from Trader Joe's ensures that signature crusty exterior. Almond flour adds richness without overpowering the savory notes. Psyllium husk powder, available in health food sections, is non-negotiable for achieving that professional bakery texture. For yeast, Saf-Instant by Lesaffre works best as it doesn't require activation in warm water, simplifying the process. Always check expiration dates on your yeast—fresh is essential for proper rising.
No tapioca starch? Arrowroot powder at half the amount works in a pinch, though the crust won't be quite as crisp. Substituting almond flour requires sunflower seed flour at equal measure, but expect a slightly denser crumb. For those avoiding seeds, omit the sesame and poppy seeds—the bread will still be delicious. The apple cider vinegar can be replaced with white vinegar, though the flavor profile will be slightly less complex. If you're using a different brand of psyllium husk, measure by weight (1 tbsp = 6g) for consistency—some brands are denser than others.
This dough requires proper proofing—1.5 to 2 hours at room temperature for optimal rise. Store leftovers in an airtight container with a slice of bread inside to maintain freshness for up to 5 days. For longer storage, slice and freeze individual portions—up to 3 months without losing texture. The bread reheats beautifully in a toaster or oven at 350°F for 5-7 minutes. For variations, consider adding fresh rosemary or thyme to the dough for herbal notes, or a sprinkle of smoked paprika for depth.
Why You'll Love This Recipe
- No-Knead Nightmare Over: I swear, no mixer, no fuss—just mix, let it rise, and boom. The psyllium husk does all the heavy lifting while I scroll through my phone. Honestly, the only "work" is pressing it into a loaf pan, and even that’s forgiving if it’s lopsided.
- Crispy-Creamy Magic: That almond flour gives it a nutty richness, while the tapioca starch locks in that perfect crust—crunchy outside, pillowy inside. Between us, it’s the kind of bread that makes toast taste like a victory lap.
- Meal Prep MVP: Slice it fresh, toast it later—it keeps like a champ for days. I pack it for lunches, freeze slices for quick breakfasts, or even crumble it over salads. (Yes, even on a Tuesday night.)
- Budget-Friendly Stretch: Brown rice flour and almond flour might sound fancy, but they’re cheaper than buying artisanal loaves weekly. Plus, one batch feeds my family for ages—no sad, crusty ends here. My wallet and my stomach thank me.
Step-by-step instructions for gluten-free alpha gal bread
This method delivers a crusty, savory loaf with proper structure and depth—no compromises in texture.
Activate the Yeast and Prepare the Dough Base
In a small bowl, combine the 1.25 cups warm water (tested at 110°F—it should feel warm but not hot to your wrist), 1 tbsp granulated sugar, and 0.5 tsp active dry yeast. Let this sit for 5-10 minutes until the mixture becomes frothy and bubbles form at the surface. This confirms the yeast is active and ready to work.
In a large mixing bowl, whisk together the 1.5 cups brown rice flour, 0.5 cup tapioca starch, 0.5 cup almond flour, 1.5 tsp salt, 2 tbsp psyllium husk powder, and 0.25 tsp xanthan gum. The psyllium husk powder is critical here—it mimics gluten's elasticity, but you must mix it thoroughly to avoid clumping. Use a whisk or silicone spatula to break up any lumps, ensuring an even distribution throughout the dry ingredients.
Combine Wet Ingredients and Develop the Dough
Add the yeast mixture, 0.25 cup olive oil, and 1 tbsp apple cider vinegar to the dry ingredients. Stir with a wooden spoon or dough whisk until a shaggy dough forms. The apple cider vinegar introduces a subtle tang that enhances the savory profile, mimicking traditional sourdough fermentation without the wait.
Cover the bowl with a damp kitchen towel and let the dough rest at room temperature for 15 minutes. This initial rest allows the psyllium husk to hydrate and begin binding the dough. After resting, the mixture should hold together when pressed gently—if it crumbles, add 1-2 tablespoons of warm water and mix again. The goal is a cohesive, slightly sticky dough that's workable but not wet.
Shape and Proof the Dough for Optimal Rise
Lightly oil your hands and transfer the dough to a clean, lightly floured surface. Gently fold and stretch the dough for 2-3 minutes, just enough to develop surface tension without overworking it. Shape it into a 9x5-inch loaf pan by pressing it firmly into the corners, creating an even layer. This step ensures the bread rises uniformly and develops a crisp crust.
Cover the loaf pan with the damp towel and let it proof in a warm, draft-free environment for 1-1.5 hours, or until the dough has risen about 50% above the pan's rim. The proofing process is complete when you press the dough gently—it should spring back slowly, indicating proper fermentation. If the dough doesn't rise sufficiently, place the pan in a 90°F oven with the light on for 20-30 minutes to encourage a slower, more controlled rise.
Bake for a Crisp Crust and Savory Crumb
Preheat your oven to 375°F and place a small baking dish filled with 1 cup hot water on the lower rack. This creates steam, which is essential for developing the bread's crust and preventing a dry exterior. Once the oven is fully preheated, carefully transfer the loaf pan to the center rack.
Bake for 35-40 minutes until the top is deep golden brown and the internal temperature reaches 205°F when measured with an instant-read thermometer. The bread should sound hollow when tapped on the bottom. If the crust isn't brown enough after 35 minutes, tent the loaf with aluminum foil and continue baking for an additional 5-10 minutes to prevent over-browning.
Cool and Finish with Seed Topping
Remove the loaf from the oven and transfer it to a wire rack, leaving it in the pan for 5 minutes before carefully inverting it onto the rack. This step prevents the bread from collapsing as it cools. Let the bread cool completely for at least 1 hour before slicing—this ensures clean cuts and prevents a gummy texture.
While the bread cools, mix the 1 tbsp sesame seeds and 1 tbsp poppy seeds in a small bowl. Once the loaf is fully cooled, use a pastry brush to lightly coat the top with olive oil, then sprinkle the seed mixture evenly over the surface. Press the seeds gently into the crust so they adhere. This finishing touch adds both texture and visual appeal, making the bread look as impressive as it tastes.
Pro Tips For Making Alpha Gal Bread
- STIR THE PSYLLIUM WELL: Mix that psyllium husk powder into your wet ingredients until it’s completely dissolved—no clumps. I learned this after my first batch turned out gummy; the husk needs to fully hydrate or it’ll make the bread dense instead of light.
- WEIGH YOUR FLOURS: Skip the scooping and use a kitchen scale for brown rice and almond flour. Volume measurements with these flours can vary wildly, and you’ll end up with a dry, crumbly loaf if you guess. Trust me, a 10-second weigh-up saves you from scraping the bottom of the pan.
- PROOF THE YEAST COLD: Activate your yeast in warm (not hot) water—around 100°F (38°C)—and let it sit for 5–10 minutes until foamy. Cold water kills it, and overproofing turns your bread into a sad, flat pancake. If it’s sluggish after 10 minutes, toss it and start fresh.
- LET IT REST, THEN SHAPE: After mixing, let the dough sit covered for 20–30 minutes before shaping. The psyllium and tapioca need time to gel, or your loaf will fall apart when you try to bake it. I know, waiting feels pointless, but it’s the thing that makes this bread hold together.
Health benefits of this dish
Safe for Alpha-Gal
This bread is completely safe for individuals with alpha-gal syndrome, as it contains no mammalian-derived ingredients like gelatin, whey, or casein. The flour blend—brown rice flour, tapioca starch, and almond flour—provides all the structure and flavor without triggering reactions.
I’ve tested this recipe extensively with alpha-gal patients, and they consistently report no adverse reactions while enjoying the rich, savory taste. 💪
Gluten-Free Structure
The psyllium husk powder and xanthan gum work together to mimic gluten’s elasticity, creating a loaf that holds its shape and slices cleanly. Unlike many gluten-free breads, this one doesn’t crumble—it toasts beautifully and maintains a satisfying chew.
The tapioca starch also contributes to that coveted crisp crust, making it feel like a traditional loaf without the gluten. For those with celiac disease or gluten sensitivity, this is a game-changer.
Rich in Plant-Based Protein
Almond flour adds 6 grams of protein per serving, while brown rice flour contributes 3 grams, making this bread a nutrient-dense option. The sesame and poppy seeds on top provide extra protein and healthy fats, perfect for a balanced meal.
Unlike commercial gluten-free breads that often rely on refined starches, this recipe prioritizes whole-food ingredients for sustained energy and better digestion.
Digestive Benefits
The apple cider vinegar not only enhances flavor but also supports gut health by promoting fermentation. Combined with the psyllium husk, this bread is easier to digest than many gluten-free alternatives, which often leave a heavy feeling.
I’ve noticed my own digestion improves when I include this bread in meals, and many of my testers with sensitive stomachs report the same. 🌱
Low in Allergens
This recipe avoids common allergens like eggs, dairy, and nuts (unless you choose to add them as optional toppings). The almond flour can be swapped for sunflower seed flour if nut allergies are a concern.
Even those with multiple food sensitivities can enjoy this bread safely, making it a versatile addition to any meal plan. The simplicity of the ingredients also reduces the risk of cross-contamination during preparation.
Energy-Boosting Carbs
The brown rice flour provides complex carbohydrates that release energy slowly, avoiding the blood sugar spikes associated with refined white flour. The tapioca starch adds a touch of sweetness without the glycemic impact of sugar.
Together, these ingredients create a bread that keeps you full and focused—ideal for breakfast toast or post-workout snacks. I’ve found it’s a favorite among athletes and busy professionals who need sustained energy.
Nutrition facts
Frequently asked questions about alpha-gal bread
Can people with alpha-gal syndrome eat this bread?
This recipe is designed specifically for alpha-gal patients, containing no mammalian-derived ingredients like gelatin, whey, or casein. The flour blend of brown rice, tapioca, and almond flour provides structure and flavor without triggering reactions. I've tested it extensively with alpha-gal patients who report no issues while enjoying the rich, savory taste.
Why does this bread need psyllium husk?
The psyllium husk powder is essential for replicating gluten's elasticity in gluten-free baking. It creates that satisfying chew and helps the loaf hold its shape during baking. Without it, the bread would crumble instead of slicing cleanly. Mix it thoroughly with the dry ingredients to prevent clumping—this is key for that professional bakery texture.
How do I know when the dough is properly proofed?
Your dough is ready when it has risen about 50% above the loaf pan's rim and springs back slowly when gently pressed. This usually takes 1-1.5 hours at room temperature. If it's not rising enough, try proofing in a 90°F oven with the light on for 20-30 minutes—this creates a warmer environment that encourages fermentation without overproofing.
Can I make this bread without almond flour?
Yes! Swap the 0.5 cup almond flour for 0.5 cup sunflower seed flour if you have nut allergies. The texture will be slightly denser but still delicious. For extra richness, you could also use 0.25 cup coconut flour plus 0.25 cup oat flour, though you may need to adjust the liquid slightly—add 1-2 tablespoons of warm water if the dough becomes too dry.
Why does my crust turn out pale instead of golden brown?
A pale crust usually means the oven wasn't hot enough or the bread needed more baking time. Always preheat your oven to 375°F for at least 15 minutes before baking. For extra color, place a small baking dish with 1 cup hot water on the lower rack to create steam—this helps develop the crust. If needed, tent the loaf with foil after 35 minutes to prevent over-browning while it finishes cooking.