
Side Dishes
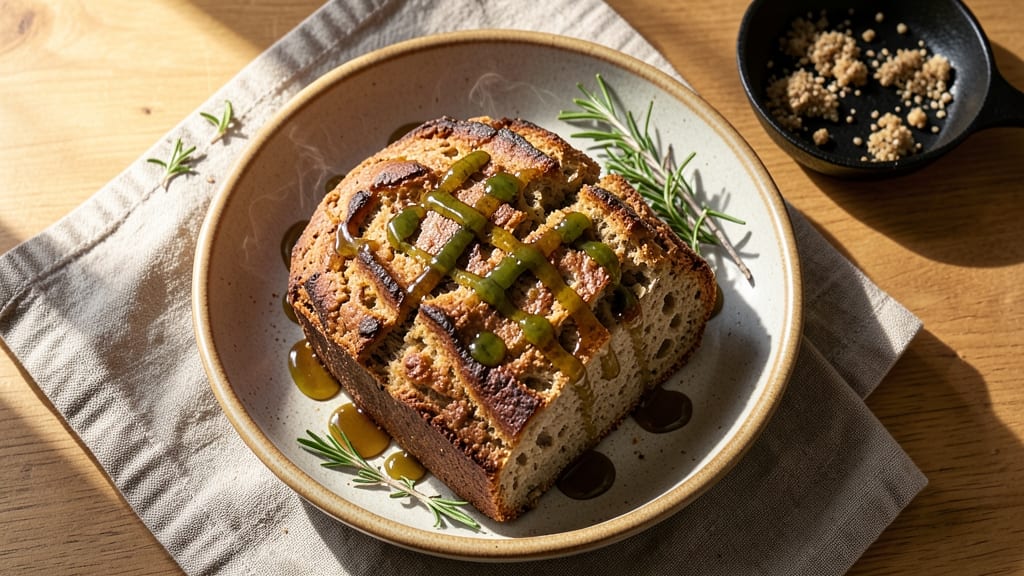
Acorn flour bread transforms rustic baking into a nutty, earthy masterpiece with a crusty exterior and tender crumb—perfect for those seeking plant-based bread with depth and texture. The secret lies in balancing acorn flour's natural density with hydration adjustments and binding agents like flaxseed meal, ensuring a loaf that's both sturdy and satisfying. This recipe delivers a bread with rich, toasty notes and a satisfying crunch that rivals traditional wheat-based loaves, all while being completely vegan.
What sets this acorn flour bread apart is its ability to deliver restaurant-quality results at home, even for beginners. The dough requires careful hydration—typically 10-15% more liquid than standard bread recipes—to account for acorn flour's absorbent nature.
A long fermentation (up to 12 hours) develops complex flavors and improves texture, while a steam bath during baking ensures that signature crispy crust without compromising the tender interior.
By the time it emerges from the oven, you'll have a loaf with a golden-brown crust that crackles with each bite and a crumb that's surprisingly light for an acorn-based bread. The nutty depth of acorn flour shines through, creating a flavor profile that's both earthy and subtly sweet.
This bread is ideal for sandwiches, toast, or serving alongside soups and stews, where its robust flavor can truly stand out.
For those experimenting with gluten-free baking, this recipe serves as an excellent foundation—simply substitute acorn flour for other gluten-free blends while adjusting hydration as needed. The result is a bread that's not only nutritious but also deeply flavorful, proving that plant-based baking can deliver on both nutrition and taste.
Let's get started on creating your perfect loaf.
Ingredients for acorn flour bread
Balancing earthy acorn flour with precise hydration creates a bread with restaurant-quality crust and tender crumb.
| Ingredient | Amount | Notes |
|---|---|---|
| Acorn Flour 🌾 | 3 cups | High-protein, finely milled preferred |
| Flaxseed Meal 🌿 | ½ cup | Ground flaxseed for binding |
| Water 💧 | 1 ¾ cups | Filtered preferred, room temperature |
| Active Dry Yeast 🍞 | 1 tsp | Fresh yeast at double quantity |
| Maple Syrup 🍯 | ¼ cup | Grade B preferred for depth |
| Extra-Virgin Olive Oil 🫒 | ¼ cup | For crust development |
| Apple Cider Vinegar 🍏 | 1 tbsp | Enhances rise and flavor |
| Sea Salt 🧂 | 1 ½ tsp | Diamond Crystal preferred |
| Psyllium Husk Powder 🌿 | 1 tbsp | For gluten-free binding |
| Ice Water ❄️ | ¼ cup | For final dough adjustment |
| Cornmeal 🌽 | ¼ cup | For dusting and steam bath |
Acorn flour demands attention—high-protein, finely milled varieties from Nuts.com or Bob's Red Mill yield the best texture. The psyllium husk is non-negotiable for gluten-free binding; Now Foods sells it in bulk. Yeast quality matters too—fresh yeast (double the amount) works better than active dry in cooler kitchens. For the maple syrup, Grade B delivers deeper flavor than Grade A. Store acorn flour in an airtight container away from light to prevent rancidity—it's sensitive to oxidation.
No psyllium husk? Xanthan gum at half the amount works in a pinch, though texture may vary. Substitute maple syrup with agave nectar (same quantity), but expect slightly less caramel depth. Olive oil shortages? Avocado oil maintains similar fat content. The apple cider vinegar can be swapped for white vinegar, though flavor complexity diminishes. For gluten-free adaptations, substitute 1:1 with brown rice flour but increase hydration by 10%. The cornmeal should be stone-ground for optimal steam bath performance—avoid instant varieties.
Fermented dough keeps 24 hours in the fridge, with flavor improving over time. For longer storage, freeze shaped loaves (unbaked) for up to 3 monthssteam bath; place a metal tray filled with boiling water below the baking sheet. Slice with a serrated knife for clean cuts. This bread reheats beautifully—wrap in foil and warm at 350°F for 5-10 minutes to restore freshness.
Why You'll Love This Recipe
- No-Fuss Dough: I swear, this bread comes together with just five ingredients and a loaf pan—no kneading, no fuss. The flaxseed meal binds it like magic while the acorn flour keeps it dense and satisfying, even when I’m too tired to measure properly.
- Earthy Sweetness: That maple syrup isn’t just for flavor—it’s the secret to a bread that’s subtly sweet but never cloying. The acorn flour gives it a nutty depth, and the yeast makes it rise just enough to feel like a treat without the guilt.
- Meal Prep Gold: Between us, this bread is my go-to for lunches all week. Toast it fresh or pack slices cold—it holds up perfectly. Plus, the flaxseed adds fiber, so I actually feel good about eating it straight from the fridge at 3 PM.
- Budget-Friendly Staple: Honestly, acorn flour is cheaper than buying pre-made bread, and a little goes a long way. The yeast and maple syrup stretch further than you’d think, and leftovers? They stay fresh for days. My wallet and my taste buds win.
Step-by-step instructions for acorn flour bread
Transforming acorn flour into a loaf with nutty depth and crispy crust requires precision and patience.
Activate the Yeast and Prepare the Wet Ingredients
In a small bowl, combine the 1.75 cups water, 0.25 cup maple syrup, and 1 tbsp apple cider vinegar at 75°F—warm enough to dissolve the syrup but not hot enough to kill the yeast. Sprinkle the 1 tsp active dry yeast over the surface and let it sit for 5-10 minutes until frothy. This activation ensures your bread rises properly later.
In a separate bowl, whisk together the 0.5 cup flaxseed meal, 1 tbsp psyllium husk powder, and 1.5 tsp sea salt. These dry ingredients create a binding matrix that mimics gluten in traditional bread. The psyllium husk powder is particularly critical—it expands when hydrated, adding structure to the dense acorn flour.
Combine and Knead the Dough
To the yeast mixture, add the 3 cups acorn flour and dry ingredients, mixing with a wooden spoon until a shaggy dough forms. The acorn flour will behave differently than wheat flour—it's denser and more absorbent, so don't be surprised if the dough feels stiff initially.
Gradually incorporate the 0.25 cup extra-virgin olive oil while kneading by hand for 5-7 minutes. The dough should become elastic and slightly tacky, though not as smooth as wheat-based doughs. If it's too dry, add 1 tablespoon of ice water at a time until cohesive. The olive oil not only adds moisture but also contributes to the crust's golden-brown development.
First Rise and Shaping
Transfer the dough to a lightly oiled bowl, cover with a damp towel, and let rise in a warm place for 1.5-2 hours until doubled in size. The acorn flour dough rises more slowly than wheat-based doughs, so be patient. You'll know it's ready when the dough springs back slowly when poked—press gently with a finger and watch for a slight indentation that doesn't disappear immediately.
Once risen, gently deflate the dough and shape it into a 9x5-inch loaf pan by pressing the edges firmly against the sides. The acorn flour's density means you'll need to use slightly more force than with wheat flour to encourage even baking. Sprinkle the bottom of the pan with 0.25 cup cornmeal to prevent sticking and create a crispy base.
Proof and Bake for Crusty Perfection
Cover the loaf pan again and let the dough proof for an additional 30-45 minutes until it rises 1-2 inches above the pan's rim. Preheat your oven to 375°F with a baking stone or inverted baking sheet on the lower rack. This creates steam during baking, which is essential for the bread's crust development.
Bake the bread for 45-50 minutes until the top is deep golden brown and the internal temperature reaches 205-210°F. Tap the bottom of the loaf—it should sound hollow. The acorn flour's high protein content means the bread will continue to firm up as it cools, so don't overbake. If the top browns too quickly, tent loosely with foil after 30 minutes.
Cool and Serve for Optimal Texture
Remove the bread from the pan and let it cool on a wire rack for at least 1 hour before slicing. This resting period allows the dense acorn flour structure to set properly, preventing a gummy crumb. The bread will be firm when warm but develop a slightly chewy texture as it cools—this is normal and desirable for acorn flour bread.
Slice with a serrated knife for clean cuts through the nutty, moist interior. Serve warm with extra-virgin olive oil drizzled on top or paired with Grade B maple syrup for a taste of the original ingredients. The crust should be crisp with a subtle crackly texture, while the interior offers a satisfyingly dense yet tender bite.
Pro Tips For Making Acorn Flour Bread
- Mix the flax first: Let the flaxseed meal soak in water for 10 minutes before adding it to the dough—this turns it into a proper binder, not just a sprinkle. I learned this the hard way when my first batch crumbled like dry sand.
- Use lukewarm water for yeast: Acorn flour bread needs yeast to work, and cold water kills it before it starts. Test the water with your wrist—it should feel like a warm bath, not a sauna or a freezer. No guesswork, just consistency.
- Don’t rush the kneading: Acorn flour is dense and stubborn, so skip the food processor and knead by hand until the dough pulls away cleanly. I used to overwork it, and the bread turned tough—now I stop when it’s just there, not perfect.
- Add maple syrup last: Mixing it in early can halt the yeast’s party. Stir it into the dough right before shaping, so the yeast still has time to do its job. Sweet bread is better when the yeast gets its chance first.
Common mistakes when making your acorn flour bread
Over-Mixing the Dough
Acorn flour dough is delicate—over-kneading develops too much gluten-like structure, making the bread dense and chewy rather than tender. Stop kneading once the dough becomes slightly elastic (about 5-7 minutes) and doesn’t feel sticky.
The acorn flour’s natural density means it won’t behave like wheat flour, so resist the urge to work it longer. 🌾
Skipping the Steam Bath
The steam bath is non-negotiable for that signature crispy crust. Without it, your loaf will bake unevenly, with a dull top and a less satisfying crunch. Place a metal tray filled with boiling water on the lower oven rack 10 minutes before baking to create the steam environment.
This step mimics traditional wood-fired ovens and is key to acorn flour bread’s texture.
Incorrect Hydration
Acorn flour absorbs 10-15% more liquid than wheat flour, so under-hydrating leads to a dry, crumbly loaf. If your dough feels too stiff after mixing, add 1 tablespoon of ice water at a time until it becomes cohesive but not sticky.
Over-hydrating, however, weakens the structure—aim for a dough that’s slightly tacky but holds together when pressed.
Rushing the Fermentation
Acorn flour dough benefits from a long, slow fermentation (up to 12 hours in the fridge) to develop deep flavor and improve texture. Skipping this step results in a bland, gummy loaf.
Let the dough rise at room temperature for 1.5-2 hours first, then refrigerate overnight for even better results. The cold slows yeast activity, enhancing flavor complexity.
Ignoring the Cooling Phase
Acorn flour bread continues to set as it cools, so slicing too soon leads to a gummy interior. Always let the loaf cool on a wire rack for at least 1 hour before cutting.
The dense acorn flour structure needs this time to firm up properly. Patience here ensures clean slices and the perfect balance of crusty exterior and tender crumb.
Using Low-Quality Acorn Flour
Not all acorn flour is created equal. Cheap or poorly milled varieties lack the high-protein content needed for proper structure and flavor. Invest in finely milled, high-protein acorn flour from reputable brands like Nuts.com or Bob’s Red Mill.
The difference in texture and taste is night and day—this is where quality truly matters. 💡
Nutrition facts
Frequently asked questions about acorn flour bread
Why does acorn flour bread need extra hydration?
Acorn flour is highly absorbent due to its dense, nutty composition—it requires 10-15% more liquid than wheat flour to achieve the right texture. The flaxseed meal and psyllium husk help bind the moisture, but without proper hydration, the bread turns out dry and crumbly. Think of it like baking with almond flour—it needs extra liquid to create a cohesive dough.
Can I make this bread without psyllium husk?
Yes, but the texture will differ. Substitute 1 tbsp psyllium husk with ½ tsp xanthan gum for gluten-free binding, though the result may be slightly less sturdy. For non-gluten-free versions, 1 extra tbsp ground flaxseed helps, but expect a denser crumb. The psyllium's unique ability to expand when hydrated is key for mimicking gluten's structure in acorn flour bread.
How do I store or reheat acorn flour bread?
Store at room temperature in an airtight container for 3-4 days or freeze the whole loaf (unbaked or sliced) for up to 3 months. To reheat, wrap slices in foil and warm at 350°F for 5-10 minutes until crispy. For extra crunch, broil for 1-2 minutes after reheating. The bread's nutty flavors actually deepen slightly when reheated!
What's the best way to adapt this for gluten-free diets?
Use a 1:1 gluten-free flour blend (like brown rice flour) while keeping all other ingredients identical. Increase hydration by 10% (about 1 extra tbsp water) since gluten-free flours absorb differently. Add ½ tsp xanthan gum if your blend doesn't include it. The acorn flour's natural density helps create a sturdy loaf even without gluten. Always test small batches first!
Can I add seeds or nuts to this recipe?
Try 1 cup toasted walnuts or pecans (chopped) or 2 tbsp pumpkin seeds for extra crunch and nutrition. Fold them into the dough during the final kneading stage. For sweet variations, mix in ¼ cup dried cranberries or chopped dates. Just reduce the acorn flour by 2 tbsp to maintain proper hydration. The nuts/seeds should be lightly toasted to enhance flavor.